
If planning your week (and sticking to that plan) is challenging, you’re not alone. I think anyone who has several projects going at the same time — especially with competing deadlines — struggles with the same problem. The good news is once you find the right way to plan your week, your life will be a lot easier.
I’ve been obsessed with finding the “right way” to plan ever since my first “real” job, as an assistant editor at a small scientific publishing company in Philadelphia. In that job, and every job after that, my day consisted of managing a never-ending stream of projects, big and small. At one position in Portland, Oregon, project management was even part of my job description.
When I became a freelance health and science writer, I thought it would be easier for me to plan my week — I worked for myself, I controlled what work I took on — but that was not the case. If anything, planning is even more important when you’re a freelance writer, because you can’t afford to waste time on administrative tasks (because no one is paying you to check your email five times a day).
Over the course of my career, I’ve used many different systems to plan my week, from to-do lists (both paper and electronic) to mind mapping to fancy GANTT charts (a favorite tool of project managers). I’ve even tried using sticky notes stuck to every surface within reach of my office chair.
One thing I’ve learned along the way is that there is no one best way to plan your week. What works for you depends on many factors, including the type of work you do, whether you work alone or as part of a team, your personality, and your preference for paper or digital planning.
However, there are several characteristics that every weekly planning process should have in order to be effective:
- Clear: Your weekly plan should make it crystal clear what you have to get done and when it has to happen.
- Focusing: Yes, I meant to say “focusing.” Planning your week should help you decide which tasks are most important for your work … and which ones you can let go of or postpone.
- Accountable: Your plan should help you stay on track throughout your week.
- Adaptable: The thing about plans is this: you make them … and then life happens. Your planning process should allow you to adapt as needed.
- Quick: You should be able to plan your upcoming week in 10 to 15 minutes.
If all you do today is review your current planning process to see if it includes all five of those characteristics, then your work life will thank you. Of course, you might also want to update your process if it’s missing any of those traits.
But if you want to see how I plan my week in fifteen minutes with Trello, read on.

The 15-minute Weekly Planner method
My current process for planning my week is adapted from the 15-Minute Weekly Planner method developed by Steph Crowder. Steph is a podcaster and business coach who focuses on helping entrepreneurs build community and attract customers.
A bit of full disclosure before I move on. I’ve only listened to one of Steph’s Courage & Clarity podcasts, and only a snippet of it, at that. This has nothing to do with her podcasting abilities. As a writer, I’m more likely to read a book, news story, or recent scientific journal than listen to a podcast. (I’ll even read the labels on shampoo bottles for fun … even more fun now that I’m in Canada and they’re in English and French.)
But my partner Shannon (who has her own podcast for yoga teachers) is a big fan of Steph. For a while, the Courage & Clarity podcast was the background music to my morning routines. So one day while I was brushing my teeth, Shannon happened to be playing the episode where Steph explained her 15-Minute Weekly Planner method.
It sounded intriguing. And who am I to turn down a way to hack my work life? So I went to Steph’s website, downloaded the worksheet (see, I love to read things!), and gave it a try. It worked so well that I stuck with it. Well, mostly.
Steph prefers to do her planning on paper, which is how she describes it on her website. But I’m more of a digital person, so I adapted it to use with Trello, an online list-making app. Later on in this post, I describe how I do my 15-minute planning.
But first, here’s a quick summary of the steps for Steph’s method (if you want to see them in detail, complete with a handy worksheet, check out her website):
- Brain dump: Write down everything you could possibly work on during the upcoming week. This includes tasks and meetings that are already on your calendar, projects that need to be started or finished, errands you have to run, books you want to read, webinars you want to take, etc.
- Days of the week: Make a separate list with space for each day of the week. Steph writes the brain dump list on one half of a single piece of paper and the days on the other half, with a dividing line down the middle of the page.
- Commitments (“rocks”): Add the things to your upcoming week that you’ve already committed to, such as meetings or interviews, projects that have set deadlines, appointments (personal or work) that fall within your work week.
- Growth-based actions (“pebbles”): Identify the highest-priority tasks that will help move your business forward, things like creating content, working on a training for your customers, or taking a course that will help you improve. Add these to one of the days of your week. Many of these items don’t have deadlines, which means you probably never get around to doing them because you’re so busy with other things, like sitting in meetings or checking your email.
- Baseline tasks (“sand”): This is everything else — email, financial planning and tracking, updating your website, filing papers (if you still use paper), etc. Look at your weekly plan to see if there is any space open, then fit some of these smaller tasks into those holes.
There you go. Your week is planned. And the most important thing (which Steph is very clear about) is that you started with the things that matter most, rather than filling up your week with stuff that makes you feel like you are busy, but doesn’t really help you move forward.
Plan your week using Trello
I use Steph’s method almost exactly the way she describes it, except I do it all on Trello. There are a few reasons for this: 1) my handwriting can be very messy, especially when I’m excited or in a hurry; 2) I like having the flexibility to easily move things around (remember “adaptable” from above?); 3) I never misplace my Trello boards the way I do slips of paper and notebooks.
Here’s how I do the 15-minute weekly planning process on Trello:
Trello board: I set up a Trello board solely for doing the 15-minute weekly planning. I even named it “15-Minute Weekly Planner.” This board has one list for my brain dump, and one list for each day of the week (including Saturday and Sunday).
Brain dump: When I start planning my week, I write down on my brain dump list everything I could do during the upcoming week. I also add things here throughout the week as I think of them. I can even send items to the list from email, using Trello’s Email-to-Board feature; this is handy when I’m away from my computer.
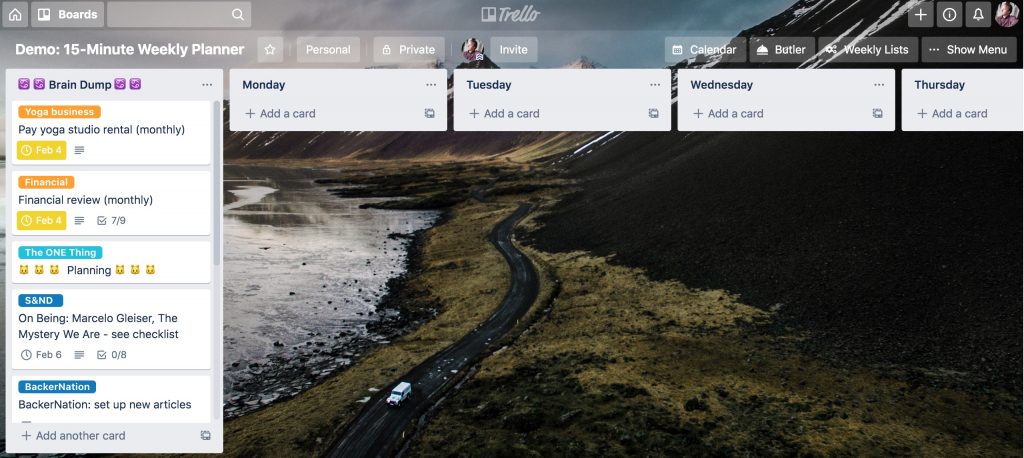
As you can see, I use labels to categorize the cards, either by client (blue), admin task (orange), growth items (teal), or personal (black). I also set dates for tasks that have deadlines and use other Trello features such as checklists, attachments, etc.
Commitments (“rocks”): Next, I add my commitments to the board under the day in which they will happen. I usually add these directly to the day-list, rather than to my brain dump list and dragging them over.
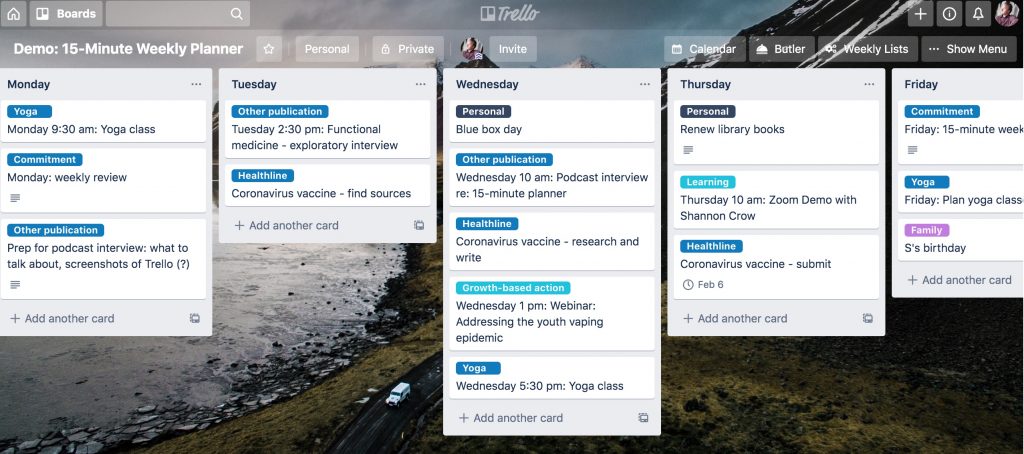
Some of these commitments have a set day and time; for those, I write that on the front of the card. I could set a deadline for these, but the time doesn’t show up on the front of the card in Trello (if you know of a workaround for that, let me know in the comments).
Other commitments can be done at any time during the day. I usually put cards with a set time at the top of the list, arranged by time. This is followed by the other cards for that day, arranged by the order in which I will tackle them. However, you could intersperse those if you wanted.
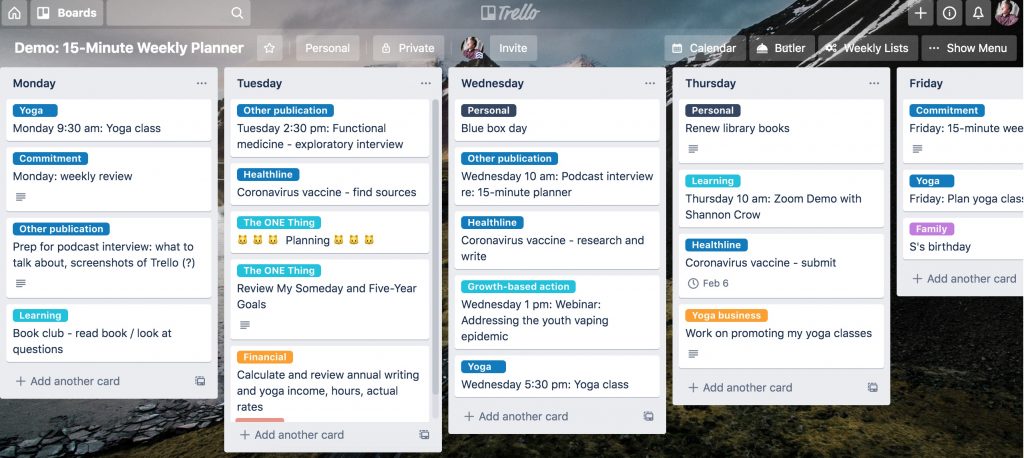
Growth-based actions (“pebbles”): At this point, I look at my 15-minute weekly planner board and get a sense of which days have the most free time (where is the white space?). Then I take the most important growth-based actions from my brain dump list and move them to different days, again, arranging them in the order in which I will tackle them.
Baseline tasks (“sand”): Finally, I add administrative tasks that need to get done during the week, along with additional ones if I have extra time. Even though these don’t have set day/times, they are often still important. But I can usually squeeze them into the empty spaces on my board, or put them at the end of the day when I don’t have the energy for writing or being creative.
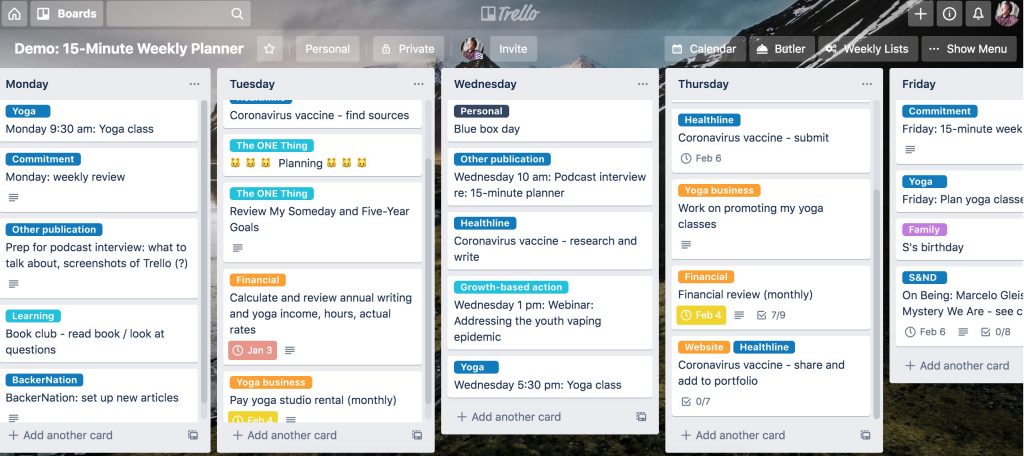
After this, I do a quick review to make sure I’ve added everything that is important and that the days look well balanced.
Templates: Once you’ve done the 15-Minute Weekly Planner method on Trello for a few weeks, you might find that certain tasks recur. I’ve created a list of recurring tasks that I can copy to my 15-minute weekly planner board. I now keep this list on a separate Operations board.
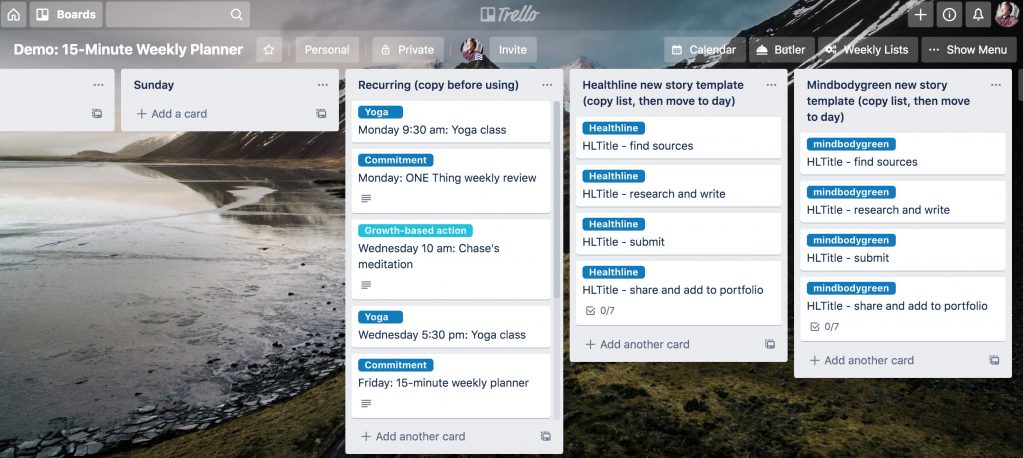
I also use templates for health and science articles that I’m working on. For example, when I am assigned a new article, there are several steps that I go through each time — finding sources to interview, researching and writing the article, submitting it, sharing it on social media when it’s published. I have a separate card for each of those activities, because they often occur on different days.
When I am assigned a new story, I copy the templates, update the title, and move the cards to the appropriate day on the 15-minute weekly planner board. Some of these cards have checklists that I use for that stage. For other cards, I set a due date. But you can use templates however you would like.
Getting the most out of planning your week
If you think you’d like to try out this process, I recommend first following Steph’s guide for the 15-Minute Weekly Planner method. Once you’ve done it her way a few times, feel free to adapt it to suit your needs. Maybe you prefer paper, or maybe you’d like to use Trello or even mind mapping software.
Here are few tips for making the most of your weekly planning:
- Make it quick. Once you get used to this process, it shouldn’t take you more than 15 minutes to plan your week. I usually do my planning on Friday afternoon, which allows me to review my previous week and get ready for the next. Ideally, you would plan on the same day and time each week, so block it off on your calendar (and add it to your 15-minute weekly planner).
- Avoid doing as you plan. Your planning time is for just that — planning. It can be tempting to take care of a few tasks along the way, but this can quickly overwhelm you (and you often end up doing things that aren’t really big-picture items).
- Review your board daily. I start my day by reviewing my board. This sets me up to focus on the most important tasks for that day. I also review the board at the end of the day and move things to the next day if I didn’t get to them.
- Don’t overload your board. It can be tempting to add dozens of cards to your day-lists. Avoid that temptation, because it will lead to you having to move cards to another day all the time, or becoming overwhelmed. After a few weeks of planning my week like this, I developed a good sense of how much I can reasonably accomplish during the day.
- Learn to say no. When you add cards to your day-lists, think about whether you really need to be doing this task. This is especially true for commitments. Do you need to go to every meeting that you’ve said yes to? Do you need to watch all those Zoom webinars you’ve signed up for? The key to the 15-minute Weekly Planner method is deciding carefully what you choose to work on.
- Be flexible. You may have already noticed that the Trello day-lists don’t look like a calendar. You could do this planning on a calendar. However, I find that if I assign all my tasks to a set time of day, my schedule can easily get off track … which is very stressful. Instead, I only assign times for things that have to happen at that time, such as meetings and webinars. For the rest of the tasks, I do the most important ones first and work my way down the list.
I’ve tried to be clear about how I plan my week, but if you have any questions, feel free to leave me a comment below. And be sure to check out Steph Crowder’s resources on the 15-minute Weekly Planner method. I would start with that and then reread my post — it will probably make more sense then.
If you give this a try, do it when you have time to focus on it. Even though I can do my planning in 15 minutes or less now, the first few times took a bit longer. Also, you might want to do this alongside your current planning method, in case it doesn’t go smoothly.
Over time, though, you might find that the 15-Minute Planner method (or your version of it) helps you focus on getting the most important tasks done — aka the ones that move your business forward.
_____
To hear more about how to use Trello to plan your week in 15 minutes, check out the interview I did for The Connected Yoga Teacher podcast.

That was really helpful. Thanks!